Tag Archives: vegetarian

Roasted Aubergine

This is my new favourite way to eat aubergine. I make it all the time. The flavours intensify in the oven and every part of the aubergine becomes delicious. It’s easy, simple, and there is no waste!

You can adjust the flavours depending on what you are serving it with. If you’re serving with Italian food, use fresh basil, dried oregano, and lots of garlic.

*Here’s a little extra something for you. If you make too much, or you want to try something different – scoop the fleshy aubergine out the skin when it’s baked and mix in the food processor with a dollop of yoghurt for a delicious homemade dip.*

Roasted Aubergine

Ingredients:
2 cloves of garlic, halved
1 tsp smoked paprika
1 tsp dried mint
pinch cinnamon
handful fresh parsley, chopped
squeeze of 1/4 lemon
Olive oil or garlic oil
salt & pepper

1. Pre-heat oven to 200 degrees C. Slice aubergine long ways and place on a baking tray.

2. Prick the aubergine with a fork and drizzle with olive oil. Rub the garlic onto it. Sprinkle the rest of the herbs and spices on top.

3. Bake for around 40 minutes depending on your oven. Before serving, use a knife to check the aubergine is soft and cooked all the way through.

I think it is delicious served as a side dish with Moroccan style lamb and cous cous.

Enjoy!

Cheat’s Tiramisu

Oh, you know I love a quick, easy and delicious dessert! This is definitely all of those things.

It is not a completely authentic tiramisu recipe, but it is so effortless, so quick, and so tasty! I created it because I wanted to use up some leftover mascarpone, but I’m so glad that it worked out well because I will without doubt be whipping this up in a flash next time I need a quick treat!

You will need some shot glasses or very small ramekins. I think it looks best served in glass so you can see the beautiful coffee biscuits and creamy layers.

Cheat’s Tiramisu

Makes 4 mini portions

Takes around 15-20 minutes, plus chilling time.

Ingredients:

120g mascarpone
2 tbsp creme fraiche or double cream
5 sponge fingers
3 shots espresso coffee
2 tbsp cocoa powder and extra for sprinkling
2 tbsp icing sugar

1. Mix the cocoa powder with a 1/4 cup of boiling water, and stir until the powder has completely dissolved. Add the coffee, and if you have any you can add a little marsala wine too (don’t worry if you don’t have any).

2. Cut the sponge fingers into 4 quarters, and soak in the coffee-chocolate for 5 minutes.

3. Mix the mascarpone with the creme fraiche or cream and stir in the icing sugar. You can add more sugar if you like it really sweet.

4. Start layering the glasses. First put a teaspoon of creamy cheese, then a sponge quarter, and keep layering until you fill the glass. Smooth over the top with some cheese, and then decorate with a sprinkle of cocoa.

Chill in the fridge for at least 30 mins before serving. (A couple of hours is better.)

Buon appetito! Enjoy!

Cauliflower Soup with Parmesan Dumplings

This is going to be a love it or hate it recipe! Cauliflower and parmesan are both strong flavours on their own but bring them together and you get a deep roasted richness with a kick from the black pepper. I have never made cauliflower soup before, but I have eaten the vegetable many times in my mother’s Indian food and my father’s Italian food. Back in December I was inspired by the Hairy Bikers to bring the British cauliflower back into fashion. You may have seen my Cauliflower and Chickpea Curry recipe, but at the time I also vowed to try and make my own soup with the beautiful, cheap and underrated vegetable.

Like most of my recipes, this totally reflects my cooking style. This is a cheap, nutritious and easy recipe which can be made in advance. You can also easily adapt this recipe if you don’t like certain ingredients. For example, feel free to use much less black pepper if you’re not a fan. Use pecorino or gruyère for the dumplings if you don’t like parmesan. *If you prefer a softer dumpling, use white bread; personally I prefer brown.

This makes a delicious starter or light meal.

Cauliflower Soup with Parmesan Dumplings

Serves: 4-6 as a starter
Takes: 1 hr 15 mins

Ingredients:

1 Cauliflower (medium-large), washed and cut up into florets
Leaves of 1 cauliflower, sliced
1 white onion, peeled and diced
1leek, washed and sliced
4 cloves garlic, peeled
1 tsp whole black peppercorns
700 ml vegetable stock (or boiling water and 1 stock cube)
3 tbsps creme fraiche
Pinch of salt
Knob of butter
Olive oil

For the dumplings:
2 slices brown bread*
25g grated parmesan
1/2 the cauliflower leaves, sliced
1 tbsp dried parsley (or small bunch fresh)
1 egg

1. Preheat the oven to 150′. Place the cauliflower florets, garlic and whole black peppercorns on an oven tray and drizzle with olive oil. Roast in the middle of the oven for a total of 45 minutes.

2. I recommend that you prepare everything else after you put the cauliflower in the oven. This shortens the cooking time. So – prepare the other ingredients.

3. In a large saucepan, warm up 2 tbsp olive oil and a knob of butter. When it is warm and clear, add the diced onion. Softly cook for about 5 minutes, then add the leek.

4. When the onion and leek have both softened, add the vegetable stock and half the cauliflower leaves. Stir the pot, and leave to simmer for 10 minutes.

5. Put your slices of bread in the toaster or oven to dry out. Then, place them in your food processor with the other half of the cauliflower leaves, parmesan, parsley, and egg. Whizz it all up!

6. By now the cauliflower should have roasted for about 45 minutes. Check that it is cooked and softened. If not, leave it in the oven for 10 more minutes. If it is, you can now take it out the oven and add the cauliflower and garlic to the soup pot. Stir the soup and put the lid on. Save the peppercorns.

7. Grind the roasted peppercorns with your mortar and pestle and add a pinch to the soup and a pinch to the dumpling mixture.

8. Roll the dumpling mixture into little balls. You should be able to make 10-12. Lightly grease a tray and then cook the dumplings in the oven for 15 minutes.

9. Mash down, or whizz up your soup! Whatever machine you have to smooth it out will be fine! Stir in 3 dollops of creme fraiche and a pinch of salt to taste!

10. Serve hot with a swirl of creme fraiche and 2-3 dumplings per person.

Enjoy! I would love to hear your feedback if you try it!

Tip: If you like it spicy, add a pinch of smoked paprika to the soup. 

You may also like these recipes:

Sweet Potato Skin Crisps

This is literally one of the most delicious homemade snacks I have ever made. They took me over an hour to make and were devoured within 3 minutes! But so worth it.

This recipe saves on wastage, saves money, and ensures that you know exactly what ingredients are in your crisps. No msg, additives, or preservatives. Also, as I’m running on a Passover theme, this is a great way to make sure your crisps are kosher for passover!

I was making sweet potato mash and saw a great opportunity to use the tasty crispy skins as a snack.  But there are two ways to make these; you could also keep your peelings from sweet or normal potatoes and roast them separately.

Method 1:

1. Roast skin on sweet potatoes for 1 hr on 220 degrees with a drizzle of olive oil. Turn several times during roasting.
2. Remove the skins and mash the soft part of the potato with salt and pepper.  Put the skins back on the oven tray. There should still be enough oil on the tray but if it is very dry add another drizzle of olive oil. Sprinkle with salt and put back in the oven on 250 for 15 minutes.

Method 2:

1. Wash and peel potatoes or sweet potatoes. Mix with a little olive oil and a sprinkle of salt and place on an oven tray in the middle of a hot oven.
2. Cook for about 45 minutes at 250 degrees or until the skins are cooked and crispy.
3. Cook the insides of the potatoes however you want. Boil, roast, or use in soups, stews, pies…see my recipes below.

These crisps are delicious with tzatziki dip or just on their own!

Enjoy!

Tip: Try using garlic or chilli oil instead of olive oil

You may also like these recipes:

Fish Bites (Recipe and Good News!)

Great news readers! As well as my regular recipes and photographs here on my blog, I will now be posting kosher recipes over on CartoonKippah! They will be recipes inspired by my mixed Jewish background and will feature my own photography. Nothing will change on my own blog, I will just be cooking lots more!

My first post is a Kosher for Passover recipe for Fish Bites. It’s a healthy, cheap and low-fat recipe suitable for pescatarians, dieters, and those keeping Passover. Perfect for lunch or a starter. I hope you will check it out, enjoy!

Passover Recipe: Fish Bites

Jazzed-up Brown Rice

We all know that whole grains are supposed to be good for us. Brown rice is healthy, filling, and slowly releases energy compared with white rice. Personally, though, I don’t normally like it! Even though I love lots of healthy foods, brown rice is not one of my favourites.

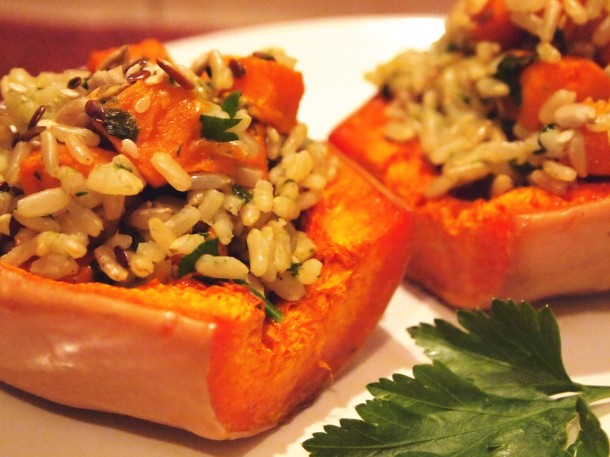
So, last week I came up with a way of making it a bit more tasty, by adding nutty, sweet and herby flavours. I still kept it healthy, but it was a big improvement from plain brown rice! This rice has a crunch from the seeds, a soft sweetness from the squash and a wonderful fragrance.

If, like me, you’re not a huge fan of brown rice, then try this recipe and let me know what you think. I will definitely be making it again!

Brown Rice With Roasted Butternut Squash, Seeds and Herbs

Start to finish time: 1 hour
Serves: 2

Ingredients:

1 medium butternut squash
1/2 cup brown rice
big bunch of fresh parsley, chopped
1/2 vegetable stock cube
3 tbsp mixed seeds (any combination of your favourite seeds, e.g. pumpkin, sunflower, sesame)
garlic oil

Salt & Pepper

1. Preheat the oven to 200 degrees. Halve the round part of the squash and drizzle with garlic oil, a pinch of salt and pepper. No need to peel! Roast for a total of 40 minutes or until soft.

2. Peel and cube the long part of the squash and also drizzle with olive oil, a pinch of salt and pepper. Allow the larger squash to roast for about 20 minutes and then add the cubes to the oven.

3. Wash the rice and throw away the water. Then add the cooking water, stock cube and half your chopped parsley. stir and then cook as per the packet. Start cooking the rice when you add the cubed squash to the oven.

4. In a separate pan, toast the seeds for a couple of minutes or until they start to brown.

5. By the time the rice is cooked, the squash should be perfectly roasted and vice versa! Mix the remaining fresh parsley, toasted seeds, and cubed squash into the rice.

6. Add salt & pepper to taste. Serve in the larger part of the roasted squash!

Enjoy!

Aubergine and Feta Tarts with a Tamarind Drizzle

Even though tamarind is usually used in asian cooking, I’ve used it here in a Mediterranean style tart. I really like the sweet and  tangy flavour and thought it would be perfect with cheese. I love all these ingredients separately but I’ve never used them together before.

As you may already know I love puff pastry for being delicious, easy to use, and amazingly versatile. It’s works so well with Mediterranean ingredients and especially cheese. I have previously posted a recipe for Mozzarella and Pesto tarts on puff pastry.

This is a simple recipe that makes a perfect starter or light lunch. Serve with a salad and some sliced meats.

Aubergine and Feta Tarts with a Tamarind Drizzle

Start to finish time: 45 minutes
Serves: 2

Ingredients

150g ready rolled puff pastry
1 aubergine, sliced about 5 mm thick
1 tbsp olive oil
4 tbsp tomato puree
4 tsp  garlic oil
100g feta cheese
a few basil leaves

Salt & Pepper

For the drizzle:
1 tbsp tamarind paste
3 tsp sugar
1 tsp honey
a few drops of lemon

1. Preheat your oven to 200 degrees.

2. Lay the sliced aubergine over kitchen paper and sprinkle each slice with salt. Leave for a few minutes and then dab with more kitchen roll. Turn each slice over and do the same on the other side. Move the slices to an oven tray and drizzle with olive oil. Oven cook for 5 minutes on each side. If they start to crisp, remove from the oven.

3. Whack the oven up to 220 degrees. Cut the ready rolled puff pastry into 4 of your desired shape. Move to an oiled tray and put 1 tbsp of tomato puree and 1 tsp of garlic oil on each one. Spread with the back of a teaspoon.

4. Layer the cooked aubergine next, and then crumble the feta cheese on top. Sprinkle with black pepper and then finish with a few basil leaves torn over the top.

5. Oven cook for 10 minutes or until the pastry is golden and has risen.

6. In a bowl, add about 1 tbsp of boiled water to the tamarind paste and stir until it has all mixed. Add the sugar and honey and then put it in the microwave for about 30 seconds. Stir in the lemon juice.

7.  When the tarts are golden and puffed, take them out the oven and drizzle the tamarind over them.

Serve hot or cold with a salad.

You might also like:

Orange and Ginger Cheesecake

This is a perfect Christmas dessert or simply an after dinner treat!  I created this cheesecake as a festive dessert, and I have to say, it really worked! It is beautifully sweet, creamy and tangy all at the same time. The ginger gives it an extra fiery kick too.

I have used the basic cheesecake recipe before many times. I made it up in the summer as a way to use an abundance of fresh strawberries from my parents’ garden. I cooked them with a pinch of sugar and made a delicious jam to top the cake. It went down very well at the pot luck dinner I went to so I have made it again many times with different toppings and flavourings.

Orange and Ginger Cheesecake

Takes: Around 2 hours
Serves: 8

Ingredients:
110g ginger biscuits, crushed
80g plain digestive biscuits, crushed
75g butter, melted
100g full fat soft cream cheese
250g mascarpone cheese
100ml double cream
2 tsp vanilla essence
4 tbsp icing sugar
5 satsumas or clementines, peeled and sliced

For the glaze:
Zest of 2 oranges
Juice of 1 orange
5 tbsp ginger preserve*

*As part of the glaze, I used a ginger preserve from Sainsbury’s.

1. Mix the biscuit and butter and press into the bottom of your dish. Chill in the fridge for around 30 minutes or until the butter has hardened.

2. In a small pan, heat all the glaze ingredients until simmering. Stir continuously and add water/sugar if necessary. (Continue to simmer until it has significantly reduced and feels like a sticky jam.)

3. Mix the mascarpone, cream cheese and vanilla essence in a bowl. In a separate bowl, whisk the double cream with the icing sugar until it has the stiffness of whipped cream. Gently, add it to the cheese mixture.

4. When the biscuit base has chilled, you can put the cheese on top. Put it back in the fridge for another half an hour.

5. By now the glaze should have the correct sticky thickness. Turn off the heat and allow it to cool for a few minutes. Do not let it go cold.

6. Place the satsuma slices in a neat decorative way on the cheesecake. Start with the large slices around the outside and end with the smaller slices on the inside. Brush the satsumas with the glaze, and use the remaining to glaze the visible parts of the cheese. Do it quickly and gently so as not to cook the cheese or press it out of shape.

7. Chill the whole cheesecake for at least 2 hours. I recommend making it a day before you want to eat it!

Take the cheesecake out the fridge 30 minutes before serving so as the soften the base enough to slice.

Enjoy! I really am very proud of this as it tasted so delicious and looked so festive!

Penne Funghi (and Hanukkah)

Hanukkah starts tomorrow, and many people know that Jews traditionally eat oily foods like doughnuts and potato latkes (a potato pancake made from grated potato and onion). I’m sure we will see many delicious recipes for latkes this week!

Hanukkah celebrates the miracle of the oil that burned for eight days when the Maccabees rededicated the holy Temple in Jerusalem after their victory over the Syrian-Greeks. Fried foods like potato pancakes (“latkas” in Yiddish and “livivot” in Hebrew) and doughnuts (“sufganiyot” in Hebrew) are traditional Hanukkah treats because they are cooked in oil and remind us of the miracle of the holiday. From: http://judaism.about.com/od/holidays/a/Hanukkah-Food-Traditions.htm

Another tradition which I had completely forgotten about (until my sister reminded me at our Christmukka themed food club evening) is that Jews often eat dairy at Hanukkah.

Dairy foods did not become popular on Hanukkah until the Middle Ages. The custom of eating things like cheese, cheesecake and blintzes emerged from the story of Judith. According to legend, Judith was a great beauty who saved her village from the Babylonians. The Babylonian army was besieging her village, when Judith charmed her way into the enemy camp with a basket of cheese and wine. She brought the food to the enemy general, Holofernes, who consumed increasing amounts of wine along with the cheese. (According to the story, the cheese was very salty, hence making Holoferenes very thirsty.) When Holofernes eventually became drunk and passed out, Judith beheaded him with his sword and brought his head back to the village in her basket. When the Babylonians discovered that their leader had been slain, they left. In this way Judith saved her people and eventually it became traditional to eat dairy foods in honor of her bravery. From: http://judaism.about.com/od/holidays/a/Hanukkah-Food-Traditions.htm

I personally think this tradition is all wrong and really we should be drinking more wine to remember Judith on Hanukkah! Oh well, there’s always Purim! (On the festival of Purim, Jews are supposed to get drunk.)

At Hanukkah, lots of Jews will eat their dairy in the form of cheesecake, or cottage cheese on their latkes, yum! Here is how I will be eating my dairy this year; it ties in with my pasta obsession and my love for savoury foods.

As you may have realised, I’m a big fan of easy, quick recipes. This is also a super simple and cheap recipe and works really well as part of a ‘pot luck’ dinner or buffet style lunch. And of course, it’s totally kosher. If you’re in a real rush you could get the pasta on as soon as the garlic is cooked. Make sure you give the mushrooms enough time to cook though. I personally don’t like half-cooked mushrooms as I think they can be a bit slimy that way and it gives them a bad reputation!

Penne Funghi

Takes: 35 minutes
Serves: 4

Ingredients:
300g penne pasta (or your favourite pasta)
100g button mushrooms, sliced
4 large cloves garlic, sliced
1/2 tsp dried tarragon
1/2 tsp dried oregano
25g butter
3 tbsps olive oil
3 tbsps soft cream cheese

salt & pepper

1. Heat the butter and oil in a pan on a low heat. When melted, add the garlic and about 2 minutes later, the mushrooms.

2. Soften the mushrooms for about 10 minutes or until they are all cooked and soft and covered in the garlicy butter. Then add the herbs, and some salt and pepper, stir and continue to cook on a low heat. If the sauce starts to dry out, add a little water.

3. In a separate pan, boil your pasta in the usual way for about 12 minutes or the time stated on the packet.

4. About 2 minutes before the pasta is ready add the cream cheese to the mushrooms and stir though until melted. Taste and add more salt and pepper if necessary.

5. As soon as your pasta is sieved, stir in the sauce and serve hot!

You may also like:

I would like to, once again, enter this recipe to Pasta Presto Nights, hosted by Ruth. The next post PPN will be in 2012!

Purple Brussel Sprouts

Food Club this week was Christmukka (Christmas and Hanukkah) themed. We had some delicious foods, including mulled cider, potato latkes, mince pies, my sister’s delicious christmas tree brownies, and spinach and artichoke dip (from Elly of VCBT).

Amongst other things, I made brussel sprouts. Is this your idea of food hell? Well, I know they are not the most popular vegetable for a lot of people, but they are traditionally eaten at Christmas and personally I like them! The problem is that too many people boil them until they are soft and smell like farts. Yes I said farts.

Brussel sprouts are so much better paired with garlic (I’m Indian-Italian; every meal starts with garlic!)

Purple sprouts seem to be relatively newly available.  The first mention I can find of them being available to us in the UK is from November 2010. When I saw them in Tesco I have to admit I was a bit excited! They are beautifully rich in a reddish-purple colour.

I boiled them for a few minutes until they were just starting to soften and then fried them in butter, olive oil and plenty of garlic. They lose some colour when boiling and the water turns purple!

My first impression when eating them was that they were slightly sweeter and less ‘cabbagey’ than normal sprouts. They were really quite tasty and everyone at food club thought so too!

My conclusion is that they are really tasty and worth a try; excitingly new and full of colour! However don’t give up on the regular green sprouts; we don’t want to make them redundant!